The following is my first collaborative blog post and is co-authored by Hannah Brown and myself. It has been published simultaneously on my website and on Hannah Brown’s Blog. I would like to thank Hannah for all her hard work on the workshop. And her excellent notes which are the basis of this blog.
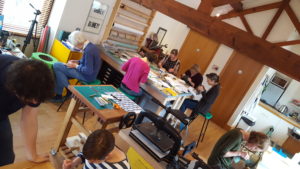
After many years working together organising the Society of Bookbinders International Bookbinding Competition Hannah Brown and Arthur Green once more joined forces for the inaugural workshop at Green’s Books. Hannah hosted a two-day workshop on embroidering a leather notebook, adding to Arthur’s own programme of classes. The workshop was held at Arthur’s studio in Oxfordshire on the 3rd and 4th September 2016. A mixed group of bookbinders, conservators and librarians filled the studio and were treated to tuition by Hannah with demonstrations of the techniques she uses to create her distinctive style of fine binding. The group also had a rare opportunity to see the many sample boards that Hannah has amassed over her career which document all of the fifty or more fine bindings that she has created.

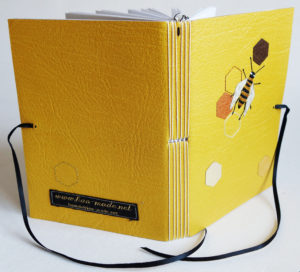
Over the course of the weekend Hannah took the participants through the process of making a limp, multi-section, leather-bound notebook – approximately A6 in size. The materials were all prepared in advance and supplied on the day. It is possible to add very attractive surface decoration to bindings with simple techniques such as applying coloured leather onlays and sewn detail and the course was planned to cover these aspects.
Day one started with work on a leather sampler, demonstrating a number of the embroidery stitches that Hannah uses in her work. Each student was given a piece of leather which they were asked to draw a series of parallel lines on the reverse of to use as a guide for each row of stitches. Hannah first started by pre-pricking a series of holes along these lines through the leather with a bodkin into some foam.
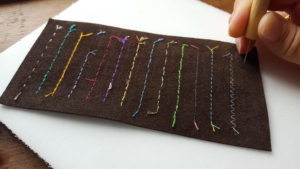
She then went on to demonstrate each stitch as follows, labelling them afterwards for reference: Running, Holbein, Back, Couching, Whipped Running (three versions), Chain, Lazy Daisy, French Knots, Machine Straight (two versions) and Machine Zig-zag. The participants tried them each out in turn and were additionally given diagrams of each of the stitches with their hand-outs.

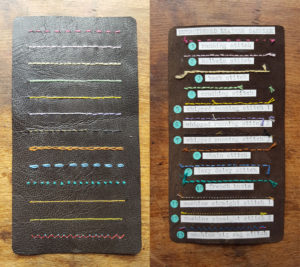
This process took most of the morning on the Saturday but provided a good basis for referring to for the rest of the weekend when designing and executing the notebook designs. The participants had been asked to plan a simple design for the cover of their notebook in advance, including areas for leather onlays, plus some linear detail and areas that embroidery techniques could be applied to. There were some great designs brought to the bench and time was allocated on the Saturday morning to evaluate these to work out how best way to apply the embroidered details.
DESIGN
For the purpose of this post Hannah has interspersed some photos of the demonstration notebook that she worked on over the course of the weekend – a much simper version of one of the fine bindings she did last year – into the notes from her hand-out (in italic font) to show the process of making the notebooks.
The hand-out started with a diagram of the notebook that was to be made over the course of the weekend in order to illustrate some of the terms in the making notes.

- Your design should be drawn out in linear form and should be made up of shapes that can be illustrated with leather cut-outs. It should also include areas to utilise embroidery stitches.

- Choose the following: your book leather, any colours you wish to use in your design of the thinner onlay leather, your patterned paper and ribbons.
- Using tracing paper make a template of the leather by drawing around the outline and also draw in the joint folds, in order to layout the design correctly.
- Draw your design onto the template.
- If you wish, your design can also feature on the back cover of the book but avoid the central panel of the cover where the construction threads will be.
- Onto tracing paper, trace around any shapes that you want to have as onlays and cut these out.
- Cut two small triangles out of the body of these shapes and attach these shapes to the reverse of the onlay leather using masking tape through these triangles.
- Make sure you place your shape the correct way around so that the shape will be the right orientation.

- Cut out these shapes using either scissors or a scalpel and cutting mat.
- Remember to cut inside the drawn lines so that your shape stays the same as the original.
- Masking tape your book leather to a piece of greyboard.
- Line up your template on top of the book leather and stick down on one edge with masking tape.
- EVA your leather pieces in place on the book leather using the template as a guide and leave to dry.
- Don’t use too much glue as it squirts out of the sides. If you have a large or complex shape you can glue these pieces in stages once you have one section of the onlay adhered down into position.
- Once you have glued down all of your leather onlays it is necessary to back-pare the leather to ensure that they are flush with the body leather of the cover. In order to do this, reverse the leather and scrape away the raised leather with a French paring knife.
- On order to check whether you have taken enough leather away, lay the leather so that the onlays are facing upwards and feel the if there is any difference in level through a piece of thin paper.
- You are now ready to start the embroidery phase of your binding. Pin the tracing paper template on top of your leather ensuring that the leather onlays are lined up with your design. Use this as a guide through which to prick your sewing holes – starting with any outlines that may feature in your design.
- Choose which style of stitch and colour thread you wish to use for the different sections of your design. I commonly use two strands of Anchor Cross-stitch Cotton Embroidery Thread. Wax these threads ahead of using them with bees wax to aid the sewing and to prevent the thread from going fluffy.
- This is a good time to refer to your leather sampler with the different stitches to remind yourself of the possibilities.
- Start to build up the shapes and tie off the threads once you have finished with each colour.
- Don’t put your holes too close together to prevent breaking through the leather
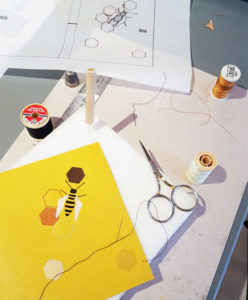
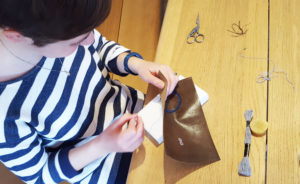
Once the outlines have been done you can move on to building up the more complex stitches to add depth to your design.

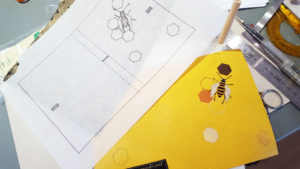
Points to note when embroidering leather:
*Draw your design onto tracing paper so that it can be viewed from both sides.
*Use as thin a needle as possible so your holes aren’t too big through the leather.
*Wax your threads so that they don’t become fluffy.
*You can change the weight and appearance of your stitches by using different numbers of thread strands together.
*You can add sparkle to your design by weaving gold thread around your stitches.
*For a more uniform look use a sewing machine an if you want to get two colours in the line chose a different coloured thread in the bobbin and alter the tension.
*You can embroider over onlays to immediately add colour beneath your stitches.
MAKING UP YOUR BOOK
- Once the embroidery is completed on your binding it is time to start preparing this piece for making the cover of your book. Firstly, if you choose to add ribbons ties this is the time to add them by making two small incisions to the width of the ribbon at the distance shown on the paper template.
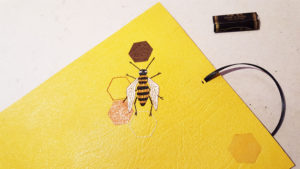
- Feed the ribbon through these incisions and either glue or tack back in place with a small stitch. The cut end of the ribbon should be secured with a dab of clear nail varnish to prevent fraying.
- You are now ready to back your leather with the piece of patterned paper. Paste the back of leather with EVA (this is done using a small roller) and stick down onto the oversize piece of paper, ensuring you don’t get any glue onto the ribbons.
- If you are adding any embroidered detail to your endpapers, make sure you remember to do this before sticking the paper to the leather!

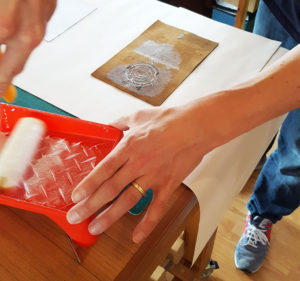
- If the placement of your leather onto the paper is critical, make sure you have drawn the outline of where the leather needs to get placed down onto the endpaper before gluing.
- Rub down throughly with a bone folder through a piece of silicone release paper, ensuring that the paper is well adhered to the leather. Once you are happy with the bond, place under a board and weight with a piece of blotting paper and leave to dry.
- Once dry, the excess patterned paper can be cut off with a scalpel.
- Be careful not to cut your ribbon ties at this point!
- The next step is to cut the slot in the centre of the leather where the sections are going to be sewn in place. This needs to be a slot about 1mm wide to allow for the thickness of the section threads passing through.
- It is also necessary to score and fold the leather where the joints are. Do so by scoring a line using your bone folder in the paper side of the leather piece and folding to 90 degrees.

- Fold the paper you have for your pages in half and cut to size, ensuring you have eight pages per section.
- All your papers are cut to size however it is important to cut the paper in the right orientation for the correct grain direction. To test the grain direction, hold the sheet the long way and bend the middle, repeat holding the paper the short way. Whichever shows the smaller curve or offers less resistance is the grain direction.
- Offer up the sections into the leather cover and pass through the slot in the cover where the sewing holes need to be.
- Prick holes at these points through the sections with a bodkin.
- Use a bulldog clip to hold the pages together during this process if required.
- Cut a piece of 25/3 linen bookbinding thread to 50 cm in length and wax using beeswax
- Sew all of the layers together using the following sewing formation:

- Tie off the ends with a double knot and trim off the edges.
- Repeat for all six sections.
- Choose a ribbon for the bookmark plus a button for the end.
- Pierce two holes through the leather spine between the central two sections.
- Sew one end of the ribbon in place at this point and tie a button to the other end of the ribbon, sealing the cut end of the ribbon with some clear nail varnish.
Hannah and Arthur were pleased that everyone managed to finish their books over the course of the two days – they had timed it just right! All the notebooks used the methods Hannah had taught to great effect and Arthur and she made sure they got a picture of the completed books all together at the end of the weekend before they were whisked away to their new homes.

Biography: Hannah graduated with a BA (Hons) in Three Dimensional Crafts from Brighton University in 2004. She began studying Bookbinding during evening classes at Brighton University before transferring to classes at The Institute in London in 2005. Hannah quickly established herself as one of the UK’s most prominent fine binders after winning first prize in the 2008 Designer Bookbinders Competition. Her work is now in many national institutions and is sought out by private collectors. Hannah specialises in fine bookbinding and other bespoke paper crafts. She works with a variety of materials and found objects, creating unique hand-crafted pieces from scratch. Due to her crafts background she is also keen to incorporate alternative skills into her work including metalwork, textiles, printmaking and woodwork. She likes playing with colours and textures and creating depth on covers.
Hannah Brown and Arthur Green, 22nd September 2016
