This blog describes a simple variant on a drop-back box.[1] By combining techniques already in use you can take the best of two well-established styles incorporating strength, elegance and simplicity; but before that a little background…[2]
The type of boxes I am referring to are constructed from mill-board with two, three-wall trays that nest inside one another, and are neatly covered, usually with cloth. There are, of course, scores of variations on this style of box: fancy boxes with false spines made to look like leather bindings, single and double walls, and elaborate custom-made boxes with compartments and pressure-flaps to house parchment manuscripts. I want to concentrate on two common methods in which a drop-back box can be constructed: ‘the case’ and the ‘all-in-one’. These two construction styles are the ones I encounter most often, and form the basis of the hybrid variant I now favour.
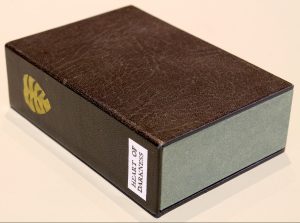
The case: two trays which nest inside each other, attached to a three-piece case. This is perhaps the most popular method for making a drop-back box. The advantage of this type of box is that it is relatively simple to construct. With a methodical approach, there is less potential for error: tray one is constructed to fit the book, and then tray two is constructed to fit tray one, a case is then made to fit tray two. If at any point there is an error with measurements, then only the current part need be re-done rather than the whole lot. A separate case can also be blocked or gold-tooled more easily than a finished box. A significant disadvantage is the weakness in its construction – the trays are fastened to the covering case with adhesive only, and are more prone to separating where you have cloth stuck to cloth at the turn-ins.
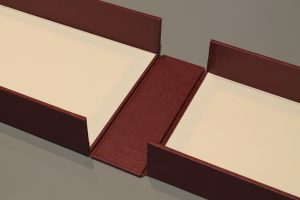
The ‘all-in-one’ is just that, a box that is covered in one piece of cloth. This method also has two three-wall trays, one nesting inside the other but there is no case, only a mill-board spine-piece. This type of box is favoured by some institutions as covering the box in one piece of cloth means there are no joins, resulting in a stronger, neater finish, which is potentially more suitable for the demands of a busy reading-room. Because this type of construction has no case, less mill-board is used, which reduces the overall weight of the box too. Two significant drawbacks for this type of box are: a) it can be quite wasteful cutting out expensive covering cloth in one piece, and b) it is fiddly to make. Precise measurements need to be made at the outset. The binder needs to judge accurately, the exact final dimension of each of the trays before they are covered. There is also the added difficulty of cutting the covering cloth out in one piece – again, no room for error, and if it’s wrong the whole box needs re-making.
The hybrid:
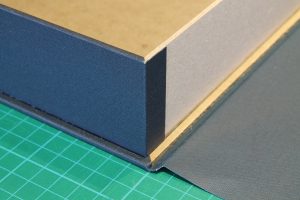
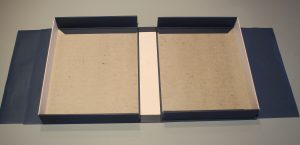
- Construct tray one to fit your book but cover only the head and tail walls with cloth.
- Make tray two in the usual way – to fit tray one – but again cover only the head and tail walls. There are a variety of ways you can approach covering which can give neat results, but do remember to make the necessary allowances for areas where you may have a double thickness of cloth, and importantly remember that the fore-edge walls of both trays will be covered later.[3]
- Make a three-piece case to fit tray two. When cutting the cloth, a turn-in of 20-25mm should be given at head and tail, but the turn-in at the fore-edges should be made long enough to cover the walls of the trays. The equation for this measurement is: 2 x height of the tray wall + the thickness of the tray wall + the turn-in.
- Stick the trays to the case and press well.
- Cut the fore-edge turn-ins of the case to fit and then turn-in over the tray walls.
- Finally, the box can be lined on the inside in your preferred way.
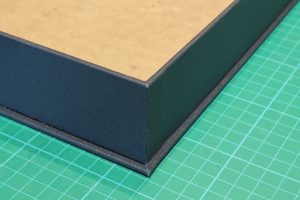
This hybrid method takes the best from two well established box making methods. The mechanical connection provided by turning in the cloth of the case over the tray walls provides a significantly stronger box with a seamless finish at the fore-edge. There is an added complexity to the hybrid over the ‘case’ method but it is much more forgiving than the ‘all-in-one’. Certainly I am not advocating that one should avoid complex work just because it’s difficult – if box making forms a regular part of your work then the skills needed to make an ‘all-in-one’ box can be honed and an in-depth understanding of the tolerances will become second nature. However, if like me, box making is something that you do only once or twice a year then this option has many merits.
[1] Also referred to as clam-shell boxes; or Solander boxes, after Daniel Chares Solander, keeper of Printed Books at the British Museum in the 18th century.
[2] This blog does not attempt explain how to make a drop-back box – there are many online tutorials which can provide this information.
[3] I find that a 1mm tolerance provides sufficient space between the book and tray one, and tray one and tray two: 0.5mm for the covering cloth and 0.5mm gap.
Arthur Green, 28 Sept 2017

Thank you Arthur for a lovely, straightforward, explanation, so uncluttered. I love the little note about Solander, a little knowledge helps me go a long way.
Cheers Pete, i’m glad you found it useful.